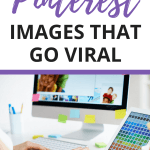
In this post, I am going to teach you how to create stunning Pinterest images that generate clicks and repins on Pinterest and possibly even go viral!
Do you know what it takes to get traffic from Pinterest?
First, you need to add images to Pinterest that link back to your website.
These images are called “Pins.”
In order to get website traffic, people need to see your Pins and then (here’s the important part) click on your Pins.
This means that getting traffic from Pinterest starts with a great Pin.
Here’s the bottom line…
Sucky Pin design equals sucky traffic.
The design of your Pins is just as important as the quality of your content so do not overlook this crucial piece of the Pinterest puzzle.
Please note this post may contain affiliate links and I may earn a commission if you click them and make a purchase. This is, of course, at no cost to you, and I only share products that I use and love myself. Please read my disclaimer for more information.
Before I jump into the post, I want to welcome you to the final post in my 5-part Pinterest Boot Camp Series!
In this series, I’ve shown you how to use Pinterest to generate traffic and leads for your business.
In case you missed the first four posts in the series, you can go back and read them here:
- Is Pinterest Right for Your Business: 14 Niches Perfect for Pinterest
- 4 Mistakes You’re Making on Pinterest
- 6 Ways to Optimize Your Pinterest Account for Maximum Results
- Why Pinterest Isn’t Working for You and How to Fix It
Now it’s time to dive in and talk about Pin design!

Designing Images for Pinterest
A huge mistake I see many new bloggers make is to design one image for their blog post and expect that image to be shared across all social channels.
Many people don’t realize that images that work great on traditional social channels such as Facebook, Twitter, LinkedIn, and Instagram, don’t work well on Pinterest.
If you want your content shared on Pinterest you HAVE to design separate images specific for Pinterest.
Every blog post you create should have at least two or more Pinterest images.
For my own blog posts, I create one featured image that can be shared on Facebook, Linkedin, and Twitter, and I create three or more images specifically for Pinterest.
Below are examples of the images I create for my blog posts.
The image above is an example of a featured image on my blog, but it also works well when shared on Facebook, Twitter, and LinkedIn.
The three images below are examples of images I create just for Pinterest.
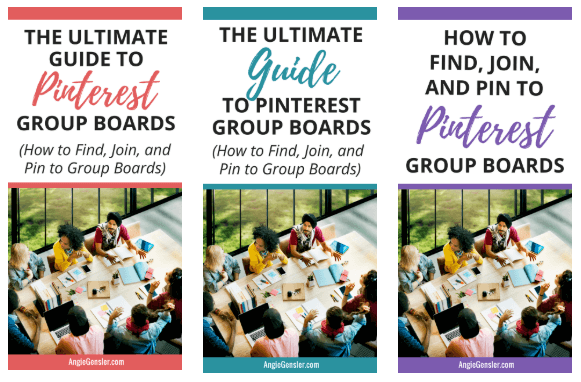
If you want to get traffic from Pinterest, it’s very important to create separate images specifically for Pinterest.
Landscape and square images have extremely low engagement rates on Pinterest.
Typically, Pinterest users won’t Pin landscape images intended for other social platforms.
Plus, many group board owners won’t allow contributors to add landscape Pins to the board.
Most group boards have a “long Pins only” rule.
You also can’t expect Pinterest users to Pin a photograph from your blog.
For example, if you’re a food blogger and you have a bunch of landscape photographs of your recipe embedded in your blog post, it’s highly unlikely one of those images will go viral on Pinterest.
If it does go viral, there’s no easy way to identify that the image leads back to you!
This is why it’s crucial to design branded Pinterest images.
To do this, you need graphic design tools.
Design Tools to Create Pinterest Images
There’s no limit to the number of different tools and software programs you can use to design your Pins.
One of the more popular design tools is Adobe Photoshop.
If you’re an experienced Photoshop user then it’s your best bet.
You’ll get all the features you need to design viral Pins.
But, if you’ve never used Photoshop before, I don’t recommend starting now.
Photoshop is not intuitive.
It’s very difficult to learn on your own and requires lots of training.
Plus, it’s one of the more expensive graphic design software programs.
Instead, I recommend Canva.com to design Pinterest images and social media graphics.
Canva is a free online design tool with advanced features for the paid version.
I was an Adobe snob for years but converted the day I discovered Canva.
It’s simple to use and allows me to create images extremely fast.
Plus, the predesigned templates are a huge help when you’re feeling uninspired.
Canva lacks many of the advanced features of Photoshop, but it makes up for it in speed and ease of use.
Another popular design tool amongst bloggers is PicMonkey.com.
PicMonkey is a photo editor in addition to a design tool.
The photo editing features are great, but as a design tool, it’s not nearly as robust as Canva.
Here’s a breakdown of the design tools I use:
Canva.com – Free online design tool that’s quick and easy to use. I use Canva to create all the graphics and images for my website, blog posts, social media content, etc.
BeFunky – Free online photo editor and design tool. I use BeFunky to make simple photo edits such as teeth whitening and red-eye removal. Plus, touching up photos with BeFunky is 10 times faster and easier than it is with Photoshop.
Pixlr Editor – Free online photo editor that looks and works similar to Photoshop. I use Pixlr when I need to do some advanced editing that I can’t do in Canva or BeFunky.
Adobe Express – Free online photo editor that looks and design tool. Adobe Photoshop has been around for decades and is still the industry standard when it comes to photo editing and graphic design.
Once you have a design tool selected, you’re ready to start designing your Pins.
The first step in designing your Pins is to select the dimensions (or canvas size) of your Pin.
No matter which design tool you use to create your Pins, you’ll want to select your canvas size by pixels, not by inches or another form of measurement.
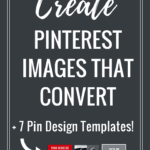
The Viral Pin Formula
Over the past year and a half, I’ve researched, tested, and learned what works, and what doesn’t work on Pinterest, and I’ve learned a thing or two about Pin design.
I’ve analyzed hundreds of Pins and studied in detail what characteristics viral Pins have in common.
My research led me to create what I call the “Viral Pin Formula.”
The Viral Pin Formula consists of 7 ingredients for Creating Viral Pinterest Pins.
If you want to make a great Pin that drives more traffic to your site (bringing you more email subscribers and paying customers) it’s important to incorporate all 7 ingredients of the Viral Pin Formula into your designs.
First Ingredient of the Viral Pin Formula
The first ingredient in the Viral Pin Formula is to go long.
This means you want your Pins to be longer than they are wide.
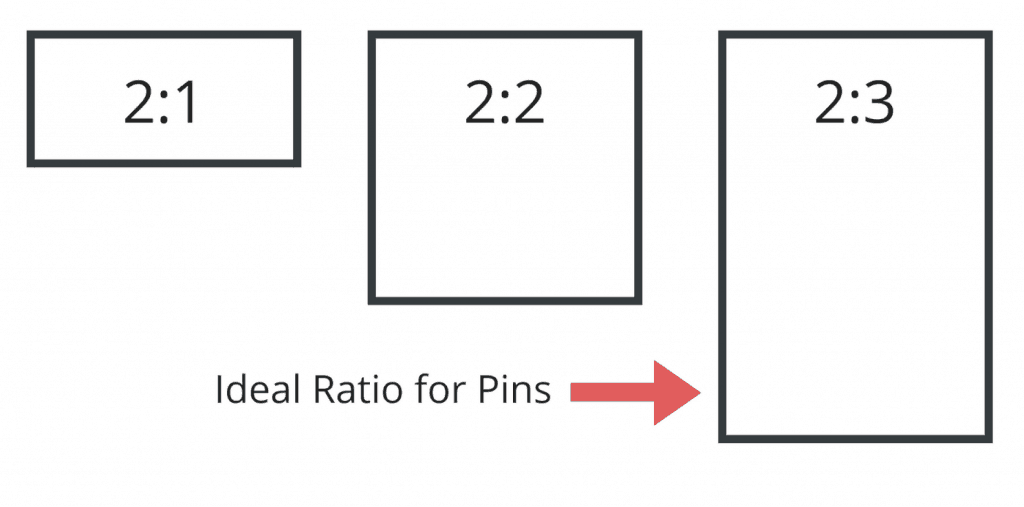
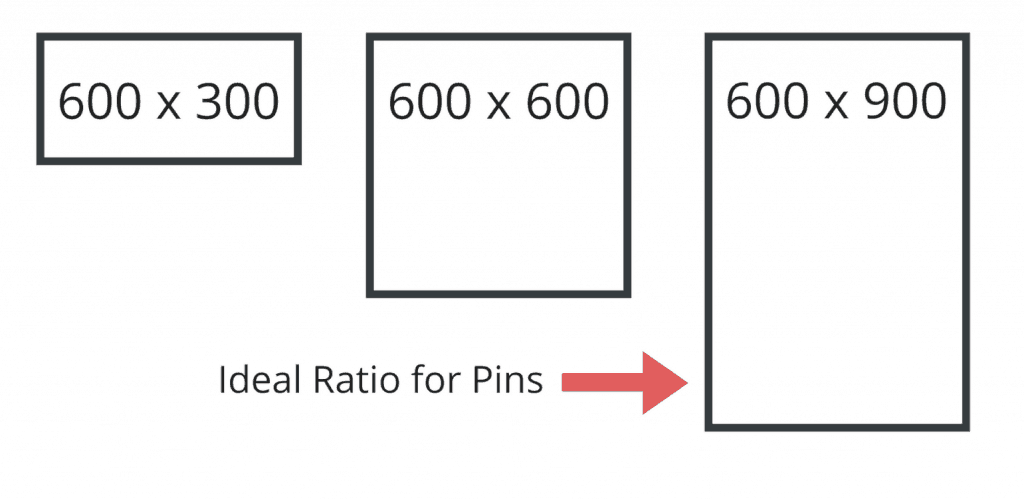
Pinterest recommends a 2:3 ratio for Pins, which means your Pins should be 1 ½ times longer than they are wide. (source)
The 2:3 ratio tends to confuse people, so I’ve created a helpful visual to demonstrate what a 2:3 ratio looks like.
Why Long Pins?
When Pinterest first started in 2010, users were Pinning a wide variety of image sizes.
Over time, Pinterest engineers noticed that long Pins received more engagement than short or square Pins.
Savvy marketers and bloggers also noticed that long Pins performed better on the platform.
Pinterest began to recommend the 2:3 ratio and content creators quickly caught on to the long Pin size.
Long Pins perform well for a couple of reasons.
First, long Pins contain more text and images than short Pins.
This means you can turn your Pin into a mini tutorial or include a variety of images and text to entice users to click through to your website.
Take a look at the three Pin examples below.
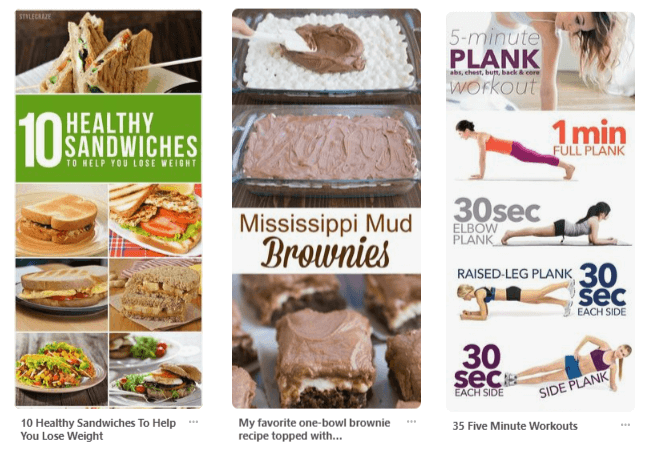
All three of these Pins make excellent use of length to feature more images and text that entice Pinterest users to click through to their website.
Imagine trying to fit the same amount of images and text on a Pin with a 2:2 ratio or even a 2:1 ratio.
The other reason long Pins work so well is that they stand out more on the platform.
Take a look at the screenshot of my Pinterest Smart Feed below.
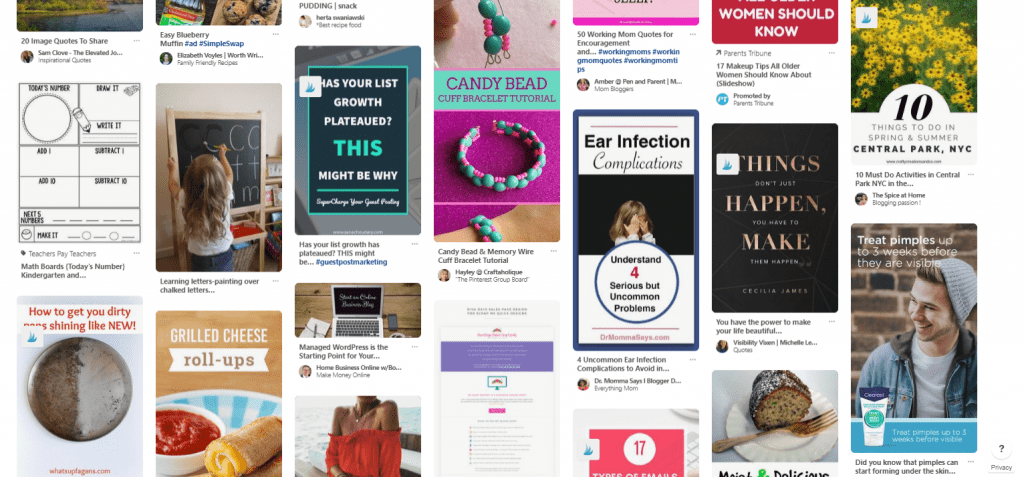
Can you find the short Pin?
It might take a bit to find it.
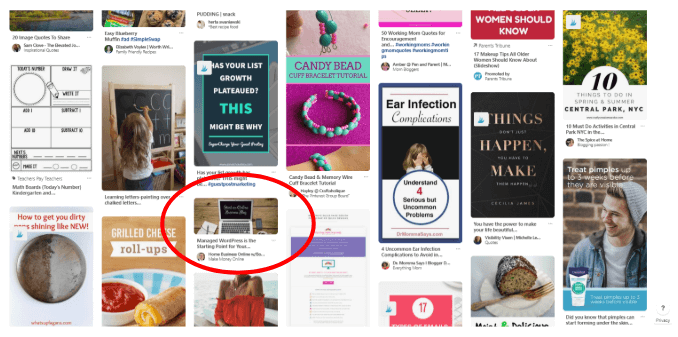
If you’re still struggling to identify it, I’ve circled it in the image below.
Now imagine you’re quickly scrolling through Pinterest on your phone.
Do you think you’ll ever notice the sad little short Pins?
Nope. You’re going to scroll right on past them!
This is why you want to go long. But how long should you go?
What is the Ideal Pin Size?
Pinterest recommends a Pin size of 600 x 900 pixels.
Over the past few years, many Pinners have taken the “go long” advice to the extreme and created ridiculously long Pins.
When I say ridiculously long, I’m talking 600 x 3000 pixels long!
Pinners created these long Pins because they take up huge chunks of real estate in the Pinterest feed which gives them more exposure and more engagement.
I experimented with my own Pins and found a 1:3 ratio performed really well.
This means my Pins were around 600 x 1800 pixels.
But wait! Don’t go making your Pins 600 x 1800, or longer.
In early 2018, Pinterest finally put a kibosh on these crazy long Pins consuming the feed.
Pinterest now cuts pins off at 1260 pixels.
In this article published by Pinterest, they state, “Pins longer than 1260px high will get cut off, and people will only see the entirety of the Pin when they tap it for a closeup.”
Take a look at the three Pins below.
The red line shows where these Pins get cut off.
Everything covered by the gray box is not shown in the feed.
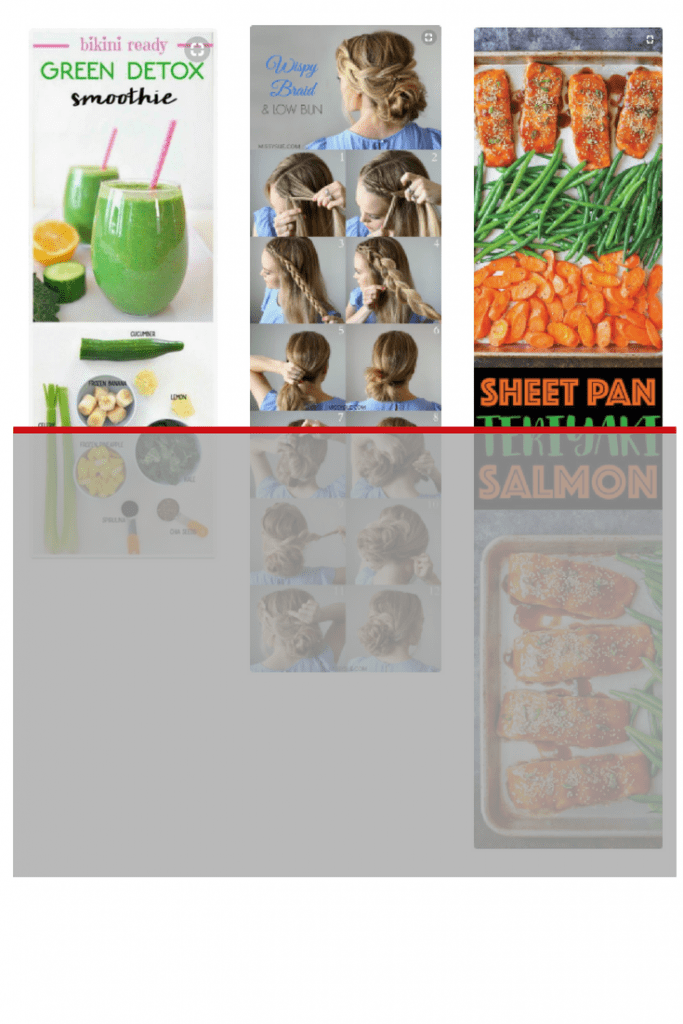
This could be a big problem if you have important text or images on the bottom of your Pin.
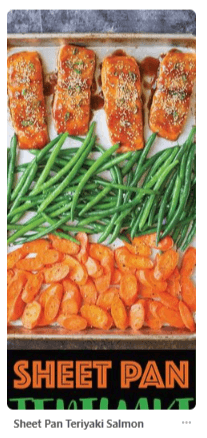
See how the text on the third Pin is cut off?
There is a small description under the Pin, but when Pinterest users are quickly scrolling through their feed, they visually scan the content.
They don’t stop to read every Pin description.
You have a split-second to get their attention.
This means you need to give your Pins the best chance possible to get clicked.
Don’t put any roadblocks or obstacles in the way that would cause someone to scroll right on past your Pin.
This is why I recommend a Pin size of 600 x 1260 pixels.
This size will ensure your Pins don’t get cut off in the smart feed, and because they’re longer than the standard 600 x 900 size, they’ll stand out and get noticed.
I also recommend that your place your text within the top 900 pixels of your Pin.
Pinterest has been promoting the 600 x 900-pixel image size for years and I would not be surprised if they eventually cut Pins off at 900 pixels.
If the Pin shown above would have placed the text at the top of the Pin, it would not have mattered much that the Pin was cut off in the smart feed.
Now that you know the ideal Pin size, let’s move on to the 2nd ingredient in the Viral Pin Formula.
Learn the Viral Pin Formula
To learn the remaining six ingredients in the Viral Pin Formula, click here to grab your copy of the Viral Pin Formula eBook!
You’ll learn exactly what it takes to make a great Pin that drives more traffic to your site – bringing you more email subscribers and paying customers.
The Viral Pin Formula eBook Includes:
- Essential design tools you need to create your Pins
- In-depth chapter for each of the 7 ingredients to creating viral Pins
- Effortless strategies to design stunning Pins that get clicks
- Loads of examples and visuals to help you understand how to apply each ingredient
- 52 irresistible power words perfect for Pinterest
- Simple tips to instantly supercharge your headlines
- Advanced strategies to promote your Pins
Remember…going viral all starts with a great Pin.
Take the first step and get your copy of the Viral Pin Formula eBook.
Great Pins Need to Lead to Great Content
It’s important to also talk about content.
We’ve all heard the saying, “content is king” and this is absolutely true on Pinterest.
Every single Pin on the platform leads directly to content.
Whether it leads to a blog post, a video, a podcast, an e-commerce store, a landing page or a sales page, it’s all content.
While this post is about the design of Pins, it’s important to note that well-designed Pins that lead to crappy content are unlikely to go viral.
The Viral Pin Formula only works if the Pin leads to high-quality content.
Your Pins can link to an e-commerce store, a landing page, or a sales page, but Pins that lead to blog posts perform best on Pinterest.
Follow these steps to maximize the impact of the Viral Pin Formula:
- Create an awesome blog post that your ideal reader would find extremely valuable.
- Make sure the post includes strong calls-to-action and multiple opt-in forms to access a free content upgrade. (Learn more about this in my upcoming List Building eBook.)
- Design multiple Pins for the blog post using all seven ingredients of the Viral Pin Formula.
- Share the Pins using the Traffic Trifecta promotion strategies.
Final Thoughts
Keep in mind that you don’t have to create the perfect branded image right away.
Test different styles and see what performs best and what feels right for your brand.
Your Pin design can and should evolve over time.
Check out the evolution of my Pins before I re-branded:
ACTION ITEMS
I’m a woman of action, so each post in this 5-part series lists specific action items you need to complete before the next post in the series.
- Create your free Canva.com account
- Grab your copy of the Viral Pin Formula ebook and learn how to apply all 7 ingredients of the Viral Pin Formula to your own Pin designs.
- Post your Pin designs in the Facebook Group and ask for feedback from the group.
Well, that’s it!
I can’t believe the five-part Pinterest Boot Camp series is over.
But, that doesn’t mean the Pinterest fun has to stop…
If you haven’t yet, enter your information in the box above to download my Pinterest Marketing Checklist and then sign up for my free Pinterest Traffic Trifecta Masterclass.
In the masterclass, you will learn how to take your Pinterest game to the next level and start getting more website traffic and email subscribers than you ever thought possible.